1. Elegant Ombre French Tips: A Soft Gradient for Modern Nails

Elegant Ombre French Tips: A Soft Gradient for Modern Nails
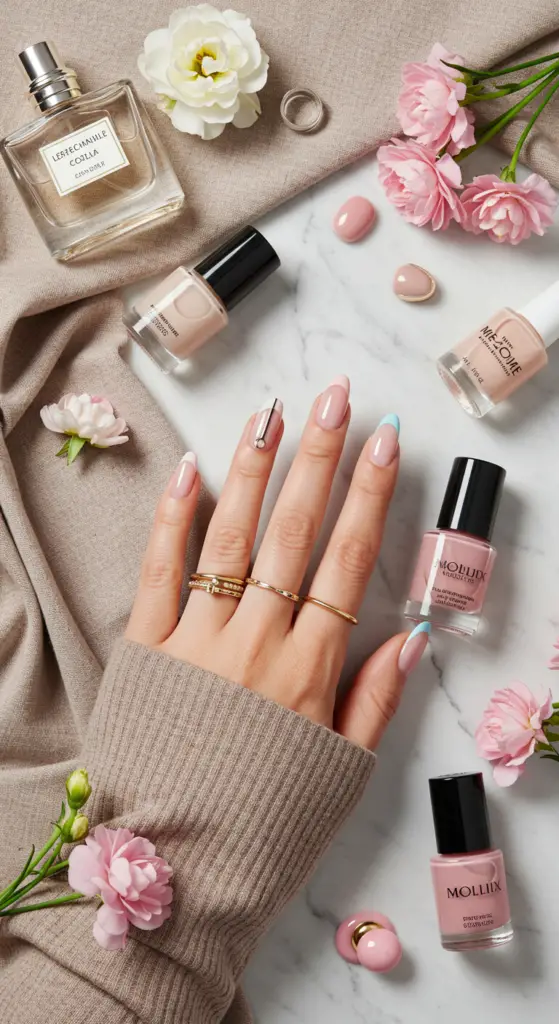
The elegant ombre French tips trend combines the classic allure of French manicures with a modern gradient twist. This nail art style is perfect for those who appreciate understated elegance while staying on-trend. With its soft color transitions, the ombre French tips provide a chic and sophisticated look that suits any occasion, from weddings to casual outings.
Step-by-Step Guidance for Ombre French Tips
Creating elegant ombre French tips at home is easier than you might think. Follow these expert steps for a flawless finish:
- Prep Your Nails: Start with clean, trimmed nails. Apply a base coat to protect your nails from staining.
- Choose Your Colors: Select two complementary shades. A soft nude paired with a pastel hue works beautifully.
- Apply the Base Color: Paint the entire nail with your base color and allow it to dry completely.
- Create the Ombre Effect: Using a makeup sponge, dab the second color onto the tips, blending it downwards into the base color. This step requires a gentle touch to achieve a seamless gradient.
- Seal with Top Coat: Finish with a high-shine top coat to protect your design and enhance the gradient effect.
Expert Tips and Common Mistakes
To perfect your ombre French tips, keep these best practices in mind:
- Use high-quality nail polish for better opacity and blendability.
- Practice the sponge technique on a piece of paper first to master your pressure and blending.
- Avoid overloading the sponge with polish; less is more for a gradual effect.
With this guide, you can confidently embrace the elegant ombre French tips trend. Not only will your nails look stunning, but you’ll also enjoy the satisfaction of a job well done!
2. Bold Geometric French Tips: Edgy Designs for a Chic Look

Bold Geometric French Tips: Edgy Designs for a Chic Look
In the world of nail art, bold geometric French tips are making a significant statement. This edgy twist on the classic French manicure combines chic sophistication with modern design, perfect for those who want to stand out.
Current Trends in Nail Art
Bold geometric designs are trending in nail art, featuring sharp lines, vibrant colors, and unique patterns. Instead of the traditional white tip, consider using neon shades or metallic hues to elevate your look. Combining different geometric shapes—such as triangles, squares, and stripes—adds an extra dimension to your manicure.
Step-by-Step Guidance
- Preparation: Start with clean, shaped nails. Push back cuticles and buff the nail surface for a smooth base.
- Base Coat: Apply a clear base coat to protect your nails.
- Main Color: Choose a bold color for your main nail bed. Apply two coats for opacity.
- Design Creation: Using nail tape, create your desired geometric patterns. This helps achieve clean lines.
- Tip Application: Fill in the geometric shapes with contrasting colors, such as black or white, for a striking effect.
- Top Coat: Seal your design with a high-gloss top coat to enhance durability and shine.
Expert Tips and Common Mistakes
- Use a steady hand or a fine brush for detailed designs.
- Avoid overloading your brush with polish to prevent smudging.
- Practice your designs on paper before applying them to your nails.
By following these best practices and incorporating bold geometric French tips into your nail routine, you can achieve a chic and fashionable look that speaks volumes about your personal style. Whether you’re heading to a party or just want to feel fabulous, this nail art is sure to impress!
3. Metallic French Tips: Adding Glam with Shimmering Finishes

Metallic French Tips: Adding Glam with Shimmering Finishes
Elevate your nail game with metallic French tips, a stunning twist on the classic manicure that combines elegance with modern flair. This trend is all about incorporating shimmering finishes that add a touch of glamour to your everyday look. Perfect for special occasions or just to make a statement, metallic French tips can be customized to fit any personal style.
Step-by-Step Guide to Achieve Metallic French Tips
- Prep Your Nails: Begin by cleaning, buffing, and priming your nails to ensure a smooth base for application.
- Base Coat: Apply a clear or nude base coat and allow it to dry completely.
- Create the French Tip: Using a nail brush or striping tape, carefully paint the tips of your nails with a metallic polish in gold, silver, or rose gold.
- Top Coat: Seal your design with a glossy top coat to enhance the shimmer and longevity of your manicure.
Expert Tips and Tricks
- Choose high-quality metallic polishes to avoid streaking and ensure a smooth finish.
- Experiment with different metallic shades for a unique look—ombre effects can also be stunning!
- For added dimension, you can layer a glitter top coat over your metallic tips.
Common Mistakes to Avoid
When trying out metallic French tips, be cautious of these pitfalls:
- Uneven Application: Always use a steady hand or tape to ensure clean lines.
- Skipping the Base Coat: A base coat is crucial for protecting your natural nails and improving polish adherence.
With the right techniques and a little creativity, metallic French tips can transform your nails into a chic accessory. Stay on-trend by incorporating shimmering finishes into your nail art routine, making every day a bit more glamorous!
4. Matte vs. Glossy French Tips: The Ultimate Textural Contrast

Matte vs. Glossy French Tips: The Ultimate Textural Contrast
The classic French tip manicure has evolved, offering a stunning textural contrast between matte and glossy finishes. This trend not only adds depth to your nails but also allows for personal expression. Let’s dive into the benefits of each finish and how to achieve the perfect look.
Choosing Between Matte and Glossy
Matte French Tips exude sophistication and subtle elegance. Ideal for a chic, understated look, matte nails can pair beautifully with textured outfits or minimalistic styles. On the other hand, glossy French tips deliver a vibrant, eye-catching shine that enhances the classic appeal of French tips.
Step-by-Step Guidance
- Prep Your Nails: Start with clean, filed nails. Apply a base coat to protect your nails.
- Apply Color: For matte tips, use a matte top coat over your chosen nail polish. For glossy tips, opt for a high-shine top coat.
- Create the Tip: Use tape for precision or a nail art brush to paint the white tips. Allow to dry completely.
- Finish Off: Seal with your chosen top coat—matte for a smooth finish or glossy for a reflective shine.
Expert Tips and Common Mistakes
To ensure your French tips stand out:
- Avoid thick layers of polish; they can lead to chipping.
- Always use a base coat for longevity.
- Experiment with colors; pastel shades look stunning in matte, while vibrant hues pop in glossy.
Remember, the choice between matte and glossy French tips comes down to personal style and the occasion. Whether you prefer the modern vibe of matte or the classic charm of glossy, both finishes can elevate your nail game!
5. Colorful Neon French Tips: Bright Styles for Summer Vibes
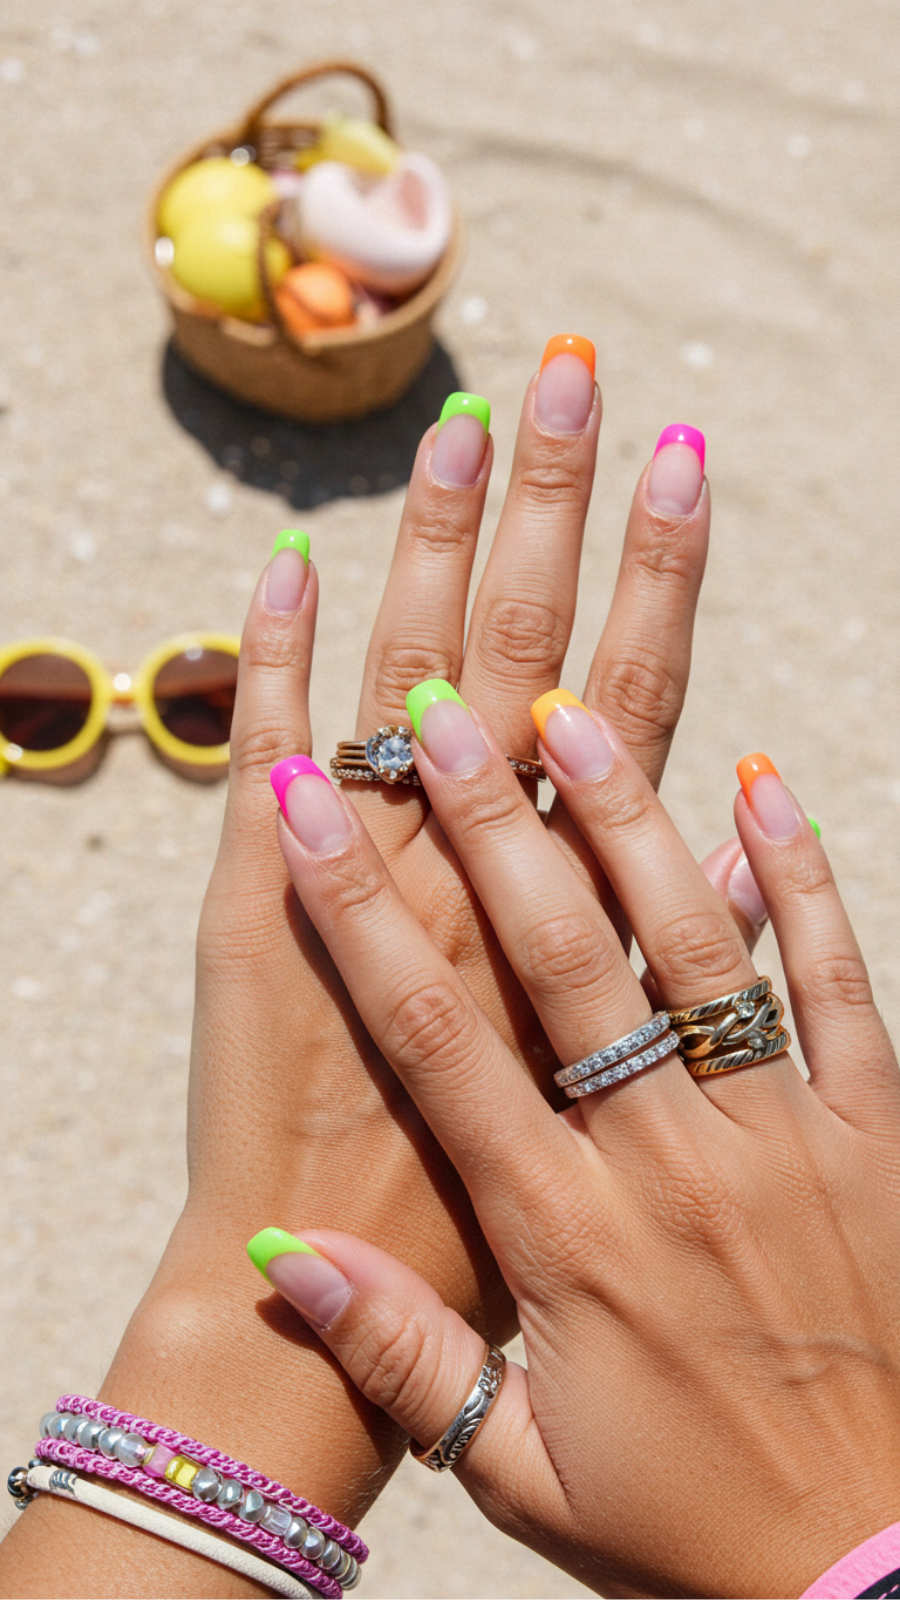
Colorful Neon French Tips: Bright Styles for Summer Vibes
As summer approaches, colorful neon French tips are making a bold statement in the nail art world. This vibrant twist on the classic French manicure is perfect for adding a pop of color to your summer style. Let’s explore how you can achieve this trendy look, along with expert tips to ensure your nails stand out.
Step-by-Step Guide to Neon French Tips
- Prep Your Nails: Start with clean, filed nails. Apply a base coat to protect your natural nails and enhance the longevity of your manicure.
- Choose Your Neon Colors: Select 2-3 neon shades that complement each other. Popular choices include electric pink, bright yellow, and vibrant green.
- Apply the Base Color: Paint your nails with a nude or white base color. This will allow the neon tips to pop.
- Create the French Tips: Use a fine nail brush or nail tape to create the French tip shape. Dip into your chosen neon color and carefully paint the tips of your nails.
- Seal the Look: Once dry, apply a top coat for a glossy finish and to protect your design.
Expert Tips and Common Mistakes to Avoid
- Tip: Use a matte top coat for a modern look or a glossy one for that classic shine.
- Common Mistake: Overloading your brush with polish can lead to uneven lines. Less is more!
- Best Practice: Allow each layer to dry completely before moving on to the next to prevent smudging.
Colorful neon French tips are not just a trend; they’re an expression of your vibrant summer spirit. Embrace this fun style and let your nails reflect the energy of the season!
6. Floral French Tips: Delicate Blooms for a Feminine Touch
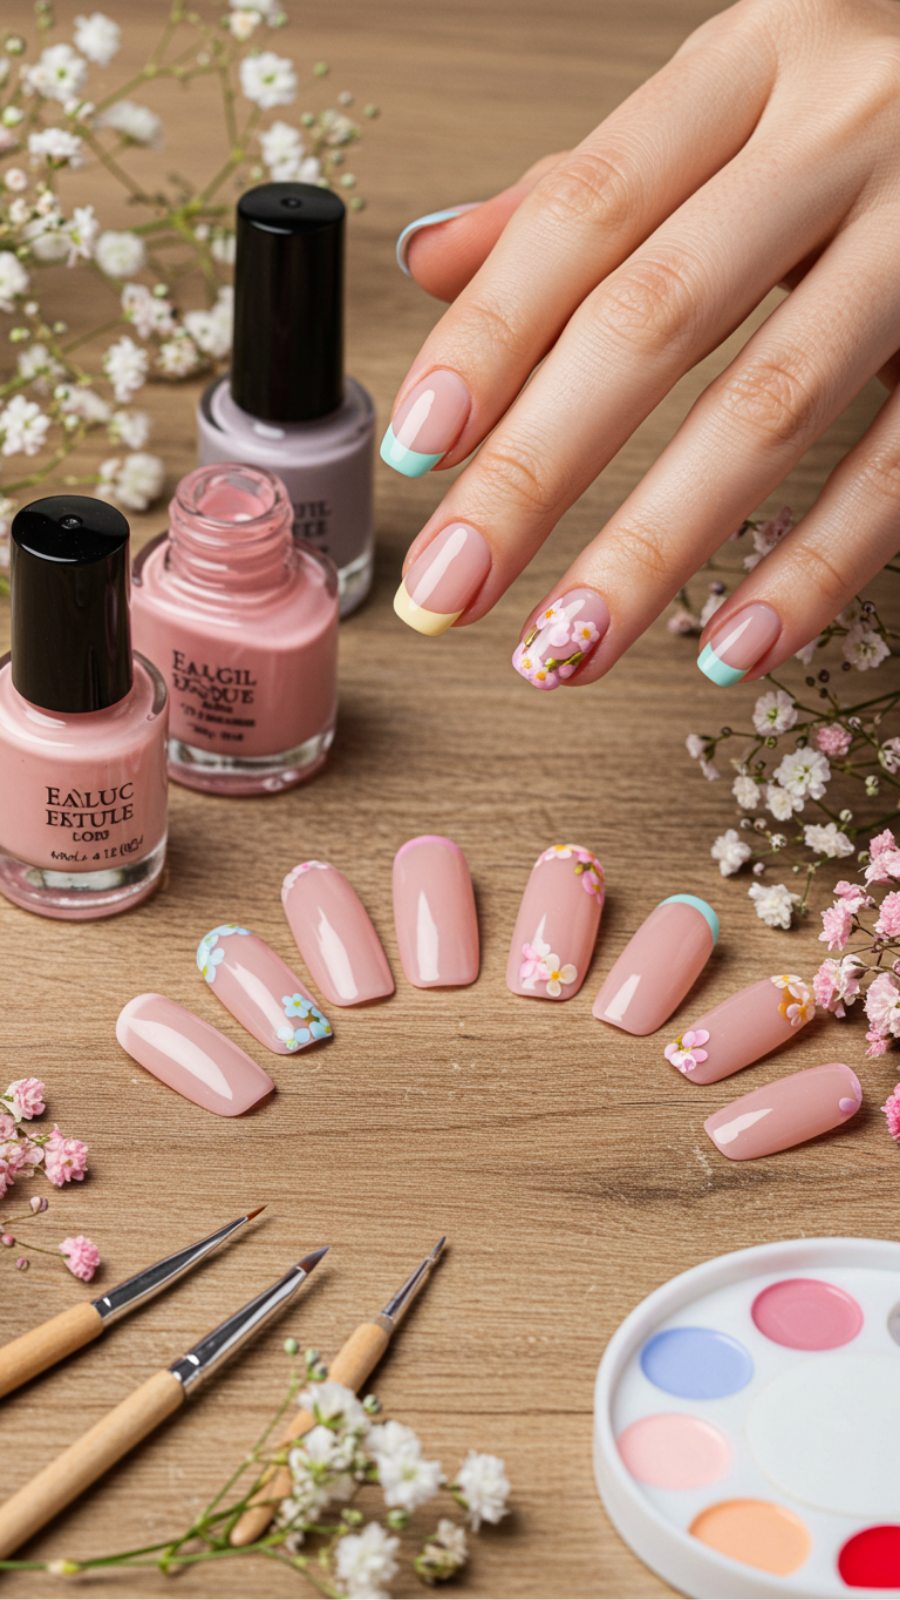
Floral French Tips: Delicate Blooms for a Feminine Touch
Floral French tips are an exquisite way to elevate the classic French manicure, infusing it with delicate blooms for a feminine touch. This elegant nail art trend combines the timeless appeal of a French tip with intricate floral designs, making it perfect for any occasion, from weddings to casual outings.
Expert Tips for Achieving Floral French Tips
To master this trendy nail art, follow these expert-level steps:
- Prep Your Nails: Begin with clean, shaped nails. Use a gentle buffer to create a smooth canvas.
- Apply Base Coat: Always start with a base coat to protect your nails and enhance longevity.
- Paint the Tips: Use a white or pastel polish to create a classic French tip. Aim for a neat line across the free edge.
- Create Floral Designs: Using a fine detail brush, paint small flowers on the nail bed. Opt for soft colors like pink, lavender, or yellow for a delicate look.
- Seal It Off: Finish with a top coat to add shine and protect your artwork.
Current Trends and Common Mistakes
This season, vibrant floral patterns combined with subtle metallic accents are in vogue. However, common mistakes include:
- Skipping the base coat, which can lead to chipping.
- Using too much polish, resulting in uneven designs.
- Forgetting to seal with a top coat, which diminishes the design’s longevity.
Best Practices for Stunning Results
For the best outcome, practice your floral designs on a piece of paper before applying them to your nails. Keep your brush steady for clean lines and consider using a dotting tool for precise flower centers. Floral French tips are versatile, allowing you to mix and match colors and styles, so feel free to experiment!
By incorporating floral French tips into your nail art repertoire, you can effortlessly showcase your creativity while embracing a classic yet modern aesthetic.
7. Negative Space French Tips: Embracing Minimalism in Nail Art

Negative Space French Tips: Embracing Minimalism in Nail Art
Negative space French tips are a chic and modern take on the classic manicure, perfectly blending minimalism with a touch of elegance. This nail art technique allows your natural nail to shine through, creating a sophisticated look that is both trendy and versatile. As the popularity of negative space designs continues to rise, it’s essential to master this art for an effortlessly polished appearance.
Step-by-Step Guide to Creating Negative Space French Tips
- Prep Your Nails: Begin by cleaning, trimming, and buffing your nails to ensure a smooth canvas.
- Apply a Base Coat: Use a clear base coat to protect your nails and enhance adhesion.
- Create the French Tip: With a fine nail brush, apply a white or pastel polish to the tip of the nail, leaving the base exposed. For a more artistic edge, consider using a curved line.
- Add a Top Coat: Finish with a glossy top coat to seal your design and add shine.
Expert Tips and Common Mistakes
To elevate your negative space French tips, consider these expert tips:
- Use high-quality polishes for better opacity and longevity.
- Experiment with colors and patterns, such as diagonal tips or geometric shapes.
- Allow each layer to dry completely to prevent smudging.
Common mistakes to avoid include:
- Applying too much polish, which can lead to uneven lines.
- Neglecting to use a base coat, risking nail damage.
Best Practices for Stunning Results
Incorporating negative space French tips into your nail art repertoire not only showcases your creativity but also aligns with current minimalist trends. Whether you’re aiming for a casual or formal look, this technique provides endless styling options. Remember to practice patience and precision for a flawless finish that will turn heads!
8. Marble Effect French Tips: Sophisticated Swirls for Luxe Appeal

Marble Effect French Tips: Sophisticated Swirls for Luxe Appeal
Elevate your nail game with the marble effect French tips, a trend that combines classic elegance with modern artistry. This refined design features sweeping swirls of color that mimic the luxurious look of marble, making it perfect for any occasion, from casual outings to formal events. Let’s dive into how you can achieve this stunning nail art.
Step-by-Step Guide to Marble Effect French Tips
- Gather Your Supplies: You’ll need a base coat, white nail polish, two contrasting colors for the marble effect (like gray and black), a dotting tool or a thin brush, and a top coat.
- Prep Your Nails: Start by cleaning and shaping your nails. Apply a base coat to protect your natural nails and allow it to dry.
- Apply the Base Color: Paint your nails with the white polish to create a clean canvas for your marble effect. Allow it to dry completely.
- Create the Marble Effect: Using a dotting tool or a thin brush, apply your two contrasting colors in small blobs on the tips of your nails. Use a swirling motion to blend them together gently, mimicking the natural veins of marble.
- Seal the Look: Once satisfied with the design, apply a top coat to enhance shine and longevity.
Expert Tips and Common Mistakes to Avoid
- Tip 1: Use a light hand when swirling to prevent the colors from becoming muddy.
- Tip 2: Experiment with different color combinations to find what suits your style best.
- Mistake to Avoid: Applying too many layers can lead to a thick finish. Keep it sleek!
Final Thoughts
The marble effect French tips are not only a stunning twist on a classic design but also a reflection of current nail art trends that emphasize intricate detailing. By following these expert tips and steps, you can enjoy luxe nails that turn heads and elevate your overall style.
9. French Tip Nail Art with Rhinestones: Sparkle Meets Classic

French Tip Nail Art with Rhinestones: Sparkle Meets Classic
French tip nail art has long been celebrated for its elegant simplicity. By incorporating rhinestones, this classic design transforms into a dazzling statement that adds a touch of glamour to any occasion. Whether you’re preparing for a wedding, a night out, or just want to elevate your everyday look, this nail art technique is both versatile and stunning.
Step-by-Step Guide to Creating French Tip Nail Art with Rhinestones
- Preparation: Start with clean, filed nails. Apply a base coat to protect your natural nails.
- Base Color: Choose a nude or sheer pink polish for the base coat. Apply two coats for opacity, allowing each coat to dry completely.
- Creating the Tips: Using a fine nail brush or nail tape, apply white polish to the tips of your nails. Aim for a smooth, curved line to achieve that classic French look.
- Add Rhinestones: While the white polish is still wet, place small rhinestones along the smile line using a dotting tool or tweezers. Ensure they are evenly spaced for a polished appearance.
- Top Coat: Finish with a clear top coat to seal in your design and enhance shine. This will also help keep your rhinestones in place.
Expert Tips and Common Mistakes to Avoid
- Tip: Use a quick-dry top coat to prevent smudging.
- Common Mistake: Overloading the brush with polish can lead to uneven tips. Use minimal product for more control.
- Best Practice: Choose rhinestones that complement your base color for a cohesive look.
Incorporating rhinestones into your French tip nail art not only showcases current beauty trends but also provides a unique personal touch. With these expert tips and a little practice, you can create a stunning manicure that’s sure to turn heads!
10. Pastel Rainbow French Tips: A Whimsical Take on Tradition

Pastel Rainbow French Tips: A Whimsical Take on Tradition
Pastel rainbow French tips are the perfect blend of classic elegance and playful whimsy, making them a must-try trend for nail art enthusiasts. This delightful twist on the traditional French manicure incorporates soft, pastel shades that evoke a sense of joy and creativity, ideal for any occasion.
Step-by-Step Guide to Achieving Pastel Rainbow French Tips
- Prep Your Nails: Begin by removing any old polish and shaping your nails to your desired length. Buff the surface for a smooth finish.
- Base Coat: Apply a clear base coat to protect your natural nails and ensure longevity.
- Choose Your Colors: Select a palette of pastel shades—think soft pinks, lilacs, mint greens, and baby blues. These colors will create a harmonious rainbow effect.
- Apply the Base Color: Paint your nails with a neutral base, such as a sheer pink or nude, allowing the pastel colors to pop.
- Create the French Tips: Using a thin nail art brush, apply each pastel color to the tips of your nails, following the natural curve. Start with the lightest color and work your way to the darkest for a gradient effect.
- Top Coat: Seal your design with a high-gloss top coat to enhance shine and durability.
Expert Tips and Common Mistakes to Avoid
- Use Quality Products: Invest in high-quality nail polishes for better pigmentation and longevity.
- Avoid Overloading the Brush: Too much polish can lead to messy lines. Use a light hand for precision.
- Practice Patience: Allow each layer to dry thoroughly to prevent smudging.
By following these steps, you’ll achieve a stunning pastel rainbow French tip manicure that stands out. Remember to embrace your creativity and experiment with different color combinations to make this whimsical design truly your own. Whether you’re heading to a brunch or a night out, pastel rainbow French tips are sure to turn heads!
11. French Tips with Foil Accents: Modern Shine and Elegance

French Tips with Foil Accents: Modern Shine and Elegance
French tips with foil accents are taking the nail art world by storm, blending classic elegance with contemporary flair. This stunning style not only enhances your manicure but also adds a unique twist that makes your nails stand out.
Current Trends in Nail Art & Beauty
As we embrace the latest trends, incorporating metallic and holographic foils into your French tips is a must. The juxtaposition of a traditional white tip against vibrant foil creates a modern look that suits any occasion—be it a wedding, party, or a casual day out.
Step-by-Step Guidance
- Preparation: Start with clean, dry nails. Gently push back cuticles and buff the nail surface for better adhesion.
- Base Coat: Apply a clear base coat to protect your nails and enhance longevity.
- French Tips: Using a white polish, create a classic French tip by painting the top third of your nail. For a more rounded or squared-off look, adjust your technique accordingly.
- Foil Application: Once dry, apply a layer of foil adhesive. Wait until it becomes tacky, then press pieces of foil onto the tips for a chic accent.
- Top Coat: Finish with a glossy top coat to seal in your design and add shine.
Expert Tips and Tricks
- Use tweezers to apply foil pieces for precision.
- Experiment with different foil colors to match your outfit or mood.
- Seal your design with a gel top coat for extra durability.
Avoid Common Mistakes
Many people overlook the importance of allowing each layer to dry fully, which can lead to smudged designs. Additionally, be cautious with the amount of foil adhesive used—less is often more.
Best Practices
To maintain the longevity of your nail art, avoid soaking your nails in water for extended periods and use gloves when doing chores. Regular maintenance will keep your French tips with foil accents looking fresh and fabulous.
Incorporating French tips with foil accents into your nail art repertoire is a fantastic way to achieve modern shine and elegance. With these expert tips, you can create stunning nails that reflect your unique style.
12. Gradient Glitter French Tips: Dazzling Sparkle for Special Occasions

Gradient Glitter French Tips: Dazzling Sparkle for Special Occasions
When it comes to nail art, gradient glitter French tips are a stunning choice for special occasions. This modern twist on a classic style adds a touch of elegance and sparkle, making it perfect for weddings, parties, or any celebratory event.
Current Trends in Nail Art
Gradient glitter nails are trending in 2023, with a focus on bespoke designs that reflect personal style. The transition from a nude or pale base to a glittery tip creates a chic and sophisticated look. Whether you prefer pastel hues or bold colors, the gradient effect offers versatility that suits any outfit.
Step-by-Step Guide to Creating Gradient Glitter French Tips
- Prep Your Nails: Start with clean, shaped nails. Apply a base coat to protect your natural nails.
- Choose Your Colors: Select a base color (like soft pink or beige) and a glitter shade that complements it.
- Apply Base Color: Paint two coats of your chosen base color and allow it to dry completely.
- Create the Gradient: Using a makeup sponge, dab the glitter polish onto the tips of your nails, blending it down towards the base.
- Seal It In: Finish with a top coat to add shine and longevity to your design.
Expert Tips and Common Mistakes to Avoid
- Tip: Use fine glitter for a smoother gradient effect.
- Common Mistake: Applying too much glitter at once can lead to an uneven finish—apply it gradually.
- Best Practice: Allow each layer to dry before applying the next to achieve a flawless finish.
With these expert tips and a little practice, your gradient glitter French tips will dazzle at any occasion. Remember, the key to stunning nail art lies in the details and the quality of products used. So, invest in high-quality polishes and tools for the best results!
13. French Tips with 3D Nail Art: Elevating Dimension and Style

French Tips with 3D Nail Art: Elevating Dimension and Style
The classic French tip manicure has evolved, and incorporating 3D nail art is the perfect way to add dimension and style. This trend not only enhances the elegant simplicity of the French manicure but also allows for personal expression and creativity. Here’s how to elevate your nail game with stunning 3D designs.
Current Trends in 3D Nail Art
As we embrace the latest trends, 3D nail art featuring floral designs, geometric shapes, and even tiny embellishments like pearls or rhinestones are in vogue. These elements can transform a traditional French tip into a bold statement.
Step-by-Step Guidance
- Preparation: Start with clean, manicured nails. Apply a base coat to protect your nails.
- French Tips: Use a white polish to create the iconic tips on your nails. For a twist, experiment with colors like pastel shades.
- 3D Application: Once the base is dry, carefully apply 3D elements using nail glue. Consider using small flowers, bows, or metallic studs.
- Top Coat: Seal your design with a clear top coat to add shine and durability.
Expert Tips and Tricks
- Use a dotting tool for precise placement of 3D elements.
- Keep designs balanced; if one nail has a large embellishment, consider keeping the others simpler.
Common Mistakes to Avoid
Avoid overloading your nails with too many 3D elements, as this can look cluttered and may chip easily. Ensure that your tips are even and polished for a flawless finish.
Best Practices
For lasting results, always use high-quality products and give each layer sufficient drying time. Regular nail care will keep your manicure looking fresh and vibrant.
By integrating 3D nail art into your French tips, you can create a unique and fashionable look that stands out. Elevate your style today!
14. Animal Print French Tips: Fierce Designs for Bold Fashionistas

Animal Print French Tips: Fierce Designs for Bold Fashionistas
Animal print French tips are taking the nail art scene by storm, offering a daring twist on the classic French manicure. Perfect for fashion-forward individuals, these fierce designs showcase creativity and personality, making them a must-try for bold fashionistas.
Current Trends in Animal Print French Tips
Incorporating animal prints like leopard, zebra, and snake into French tips adds a wild edge to your manicure. Trending styles often pair vibrant colors with traditional neutrals, creating a stunning contrast. For instance, a nude base with black leopard spots can elevate your look while remaining sophisticated.
Expert Tips and Tricks
- Choose the Right Base: Start with a high-quality base coat to protect your nails and enhance the longevity of your design.
- Use Nail Art Brushes: For precision, invest in fine detail brushes to create intricate animal print patterns.
- Seal with Top Coat: Finish with a gel top coat for a glossy, long-lasting finish.
Step-by-Step Guide to Creating Animal Print French Tips
- Apply a base coat and let it dry completely.
- Paint the tips of your nails with your chosen color (e.g., white for classic French or a vibrant hue).
- Using a detail brush, create your desired animal print pattern on the tips.
- Allow the design to dry before applying a top coat.
Common Mistakes to Avoid
Many nail enthusiasts overlook the preparation steps, such as properly filing and buffing nails, which can lead to uneven surfaces. Additionally, rushing the drying time can smudge your design.
Best Practices for Flawless Animal Print French Tips
Take your time with each layer, ensuring that each is fully dry before proceeding. Experiment with different colors and patterns to find what best suits your style, and don’t be afraid to get creative!
With these tips, you’re ready to embrace the fierce world of animal print French tips. Show off your bold personality and keep your nails on-trend!
15. French Tip Nail Art with Stripes: Clean Lines for a Modern Edge

French Tip Nail Art with Stripes: Clean Lines for a Modern Edge
The French tip nail art has long been a classic, but adding stripes introduces a fresh, modern twist. This look not only emphasizes clean lines but also allows you to express your personality through a simple yet stylish design. Here’s everything you need to know about achieving this trendy nail art style.
Step-by-Step Guide
- Prep Your Nails: Start with clean, dry nails. Push back cuticles and buff the nail surface for a smooth finish.
- Base Coat: Apply a clear base coat to protect your natural nails and enhance adhesion.
- French Tips: Using a white nail polish, create a classic French tip. For precision, use tape or a nail guide.
- Add Stripes: Choose a contrasting color to paint thin stripes across the tips. Use a striping brush for accuracy.
- Seal the Design: Finish with a top coat to protect your nail art and give it a glossy finish.
Expert Tips and Tricks
- Choose Colors Wisely: Current trends favor bold colors like neon or metallic for stripes against a soft nude base.
- Practice Your Lines: If you’re new to nail art, practice your lines on paper before attempting them on your nails.
- Use Tape: To avoid smudging, use painter’s tape to outline your French tips before applying color.
Common Mistakes to Avoid
One common mistake is not allowing each layer to dry completely, which can lead to smudging. Additionally, using too much polish on the brush can create uneven lines. Always aim for thin coats for a cleaner finish.
Best Practices
Regularly moisturize your cuticles and nails to maintain their health, and consider using a matte topcoat for a unique finish. Remember, nail art is about creativity, so feel free to mix and match colors and patterns!
Incorporating stripes into your French tip nail art is a chic way to stay on trend while showcasing your personal style. With these tips, you can achieve a polished look that’s perfect for any occasion.
16. Chic Half-Moon French Tips: A Retro Twist on Classic Elegance

Chic Half-Moon French Tips: A Retro Twist on Classic Elegance
If you’re looking to elevate your nail game this season, consider the chic half-moon French tips. This design combines the timeless appeal of the classic French manicure with a retro twist, making it a trendy choice for fashion-forward individuals. Whether you’re attending a formal event or just want to add some flair to your everyday look, half-moon French tips offer a sophisticated yet playful aesthetic.
Step-by-Step Guidance
Creating chic half-moon French tips is easier than you might think. Follow these expert-level steps:
- Preparation: Start with clean, shaped nails. Apply a base coat to protect your nails.
- Base Color: Choose a nude or pastel shade for your base color and apply two coats for opacity.
- Creating the Half-Moon: Use a circular nail stencil or tape to create the half-moon shape at the base of your nail. Apply a contrasting color, like white or metallic, to fill in the shape.
- Finishing Touch: Remove the stencil carefully and apply a top coat to seal your design and add shine.
Expert Tips and Tricks
- Use high-quality nail polish for better color payoff and longevity.
- Experiment with color combinations like navy and gold or pastel pink and white for a modern twist.
- For a unique touch, add tiny rhinestones or glitter accents at the half-moon for added elegance.
Common Mistakes to Avoid
When attempting half-moon French tips, avoid the following pitfalls:
- Using too thick a layer of polish, which can lead to smudging.
- Not allowing each layer to dry completely before moving on to the next step.
- Choosing colors that clash rather than complement for the half-moon design.
Best Practices
To achieve the best results, always use quality tools and take your time with each step. This attention to detail will ensure that your chic half-moon French tips look polished and professional.
By incorporating these chic half-moon French tips into your nail art repertoire, you’re sure to turn heads and express your unique style. This retro twist on classic elegance is not just a trend—it’s a statement.
Frequently Asked Questions
How do I create elegant ombre French tips at home?
To create elegant ombre French tips, start with a base coat and apply a nude or light pink polish. Using a makeup sponge, dab a darker shade at the tips and blend it down towards the base for a gradient effect. Seal with a top coat for a smooth finish and long-lasting wear.
Why are bold geometric French tips trending in nail art?
Bold geometric French tips are trending due to their edgy and modern aesthetic that adds personality to classic nail designs. They allow for creative expression with shapes and colors, making them perfect for fashion-forward individuals looking to stand out.
What are the best colors for metallic French tips?
The best colors for metallic French tips include gold, silver, and rose gold, as they provide a glamorous finish that catches the light beautifully. You can also experiment with holographic shades or jewel tones to add a unique twist to your metallic look.
How can I achieve the perfect matte vs. glossy French tip contrast?
To achieve the perfect matte vs. glossy French tip contrast, apply a matte top coat on the base color and a glossy top coat only on the tips. This technique creates a striking visual difference and adds depth to your nail art, making it more eye-catching.
What should I do if my colorful neon French tips are not vibrant enough?
If your colorful neon French tips lack vibrancy, try applying a white base coat before the neon polish to enhance the color’s brightness. Additionally, ensure you’re using high-quality neon polishes, as they typically contain more pigment for a bolder finish.

