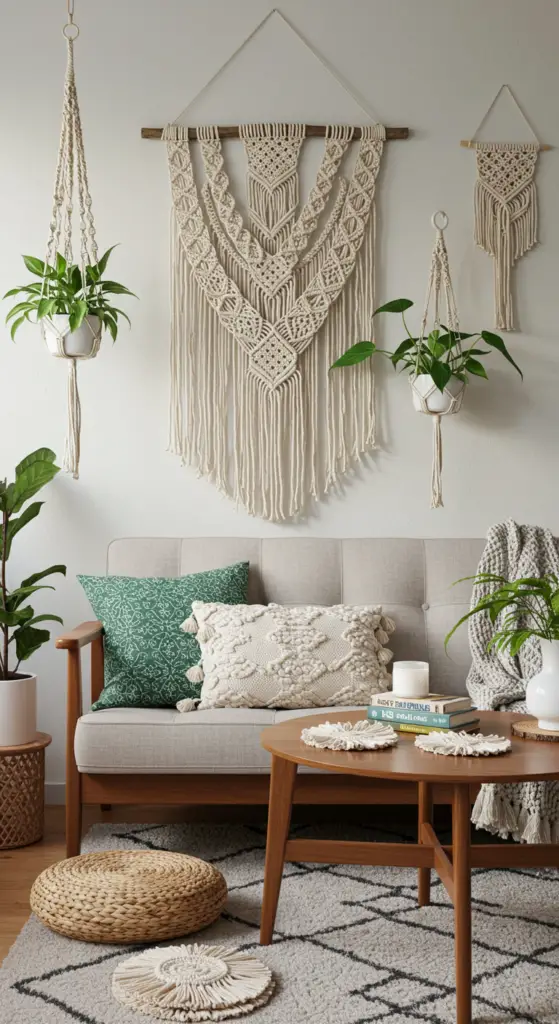
1. Boho-Chic Macramé Wall Hanging: Elevate Your Living Room Aesthetics

Boho-Chic Macramé Wall Hanging: Elevate Your Living Room Aesthetics
Transform your living room into a cozy retreat with a stunning boho-chic macramé wall hanging. This DIY project not only adds texture and warmth to your space but also showcases your creative flair. With current trends leaning towards sustainable and handcrafted decor, macramé is a perfect fit for a modern bohemian aesthetic.
Materials Needed
- 100% cotton macramé cord (3-5mm thickness)
- Wooden dowel or branch (24 inches long)
- Scissors
- Tape measure
- Wooden beads (optional for added embellishment)
Step-by-Step Guidance
- Measure and Cut: Cut your macramé cord into varying lengths, typically ranging from 2-6 feet, depending on your desired design.
- Attach the Cord: Fold each cord in half and create a lark’s head knot around the dowel. Secure the cords tightly.
- Create Patterns: Use a combination of square knots and spiral knots to form your unique pattern. Experiment with spacing for visual interest.
- Add Beads: If desired, incorporate wooden beads for a pop of contrast and texture.
- Finish and Hang: Trim the ends to your preferred length and hang your masterpiece using the dowel.
Expert Tips and Common Mistakes to Avoid
To ensure your macramé wall hanging stands out, follow these expert tips:
- Start with simple patterns if you’re a beginner.
- Avoid overly tight knots that can cause the cord to fray.
- Use a sturdy dowel or branch to prevent sagging.
With these best practices, you can create a beautiful piece that enhances your living room aesthetics. Embrace your creativity, and let your boho-chic style shine!
2. Macramé Plant Hangers: Add Greenery and Texture to Your Space

Macramé Plant Hangers: Add Greenery and Texture to Your Space
Macramé plant hangers are a fantastic way to incorporate greenery into your home while adding a touch of texture and bohemian flair. This DIY craft has surged in popularity, allowing you to create stunning hanging displays that elevate your interior decor. Here’s a guide to help you get started.
Expert Tips for Crafting Macramé Plant Hangers
To begin, gather your materials: cotton macramé cord, a wooden or metal ring, and a pot for your plant. The current trend leans towards natural fibers and neutral colors, making your hangers versatile for various decor styles.
- Measure Your Cord: Cut your macramé cord into equal lengths, typically about 10-12 feet, depending on the desired length of your hanger.
- Begin Knotting: Start with a square knot technique, which is ideal for beginners. Secure the cords to your ring using a lark’s head knot.
- Add Texture: Incorporate different knotting techniques like the spiral knot or hitch knots to create unique patterns.
Common Mistakes to Avoid
One of the most common mistakes is not measuring your cords accurately, leading to uneven hangers. Ensure you leave enough length for your knots. Additionally, avoid over-tightening your knots, which can lead to fraying.
Best Practices for a Successful Project
For best results, use a sturdy plant pot and ensure your hanger can support its weight. Experiment with various plant types—trailing varieties like pothos or string of pearls work beautifully in macramé hangers.
By following these expert tips and techniques, you can create eye-catching macramé plant hangers that not only enhance your space with greenery but also reflect your personal style.
3. Textured Macramé Table Runner: Perfect for Stylish Dining Experiences

Textured Macramé Table Runner: Perfect for Stylish Dining Experiences
Elevate your dining space with a textured macramé table runner, a trendy and elegant DIY project that adds a personal touch to your home decor. Macramé, the art of knotting cords, has surged in popularity, allowing you to create stunning textiles that blend bohemian and modern aesthetics. Follow this expert guide to craft your own stunning piece!
Materials You’ll Need
- Macramé cord (3-5 mm thickness)
- Wooden dowel or a sturdy branch
- Scissors
- Tape measure
- Optional: Fringe or beads for added texture
Step-by-Step Guidance
- Measure and Cut: Determine the desired length of your table runner, typically between 60-80 inches. Cut your macramé cord into several lengths—about 4 times the desired length of the runner.
- Attach the Cord: Fold each piece in half and attach it to the dowel using a lark’s head knot. Ensure the knots are tight for a secure hold.
- Create Patterns: Experiment with various knots such as square knots and spiral knots to develop a unique design. Keep your patterns consistent for a polished look.
- Finish and Trim: Once the desired length and design are achieved, trim the ends to your preference. Add fringe or beads for a stylish finish.
Expert Tips and Tricks
To achieve a professional look, ensure your knots are evenly spaced and your tension is consistent. Avoid common mistakes such as uneven cord lengths or overly tight knots, which can distort your design. Always practice on a small piece before tackling the full runner.
Best Practices
Embrace current trends by incorporating natural colors or using recycled materials. A textured macramé table runner not only beautifies your dining area but also serves as a conversation starter. Pair it with complementary tableware to enhance the overall aesthetic.
With this guide, you can create a stunning and functional piece that will impress your guests during any dining experience. Happy crafting!
4. DIY Macramé Curtain Tiebacks: Enhance Your Window Treatments

DIY Macramé Curtain Tiebacks: Enhance Your Window Treatments
Macramé curtain tiebacks are a stylish and functional addition to your window treatments. They not only add texture and elegance but also reflect a current trend in DIY and creative crafts. This guide will provide you with expert-level advice on how to create your own stunning macramé tiebacks that will elevate your home decor.
Materials Needed
- 3mm cotton macramé rope (choose a color that complements your curtains)
- Scissors
- Tape measure
- Wooden dowel or curtain rod for measuring
Step-by-Step Guide
- Measure and Cut: Measure the desired length of your tiebacks, typically around 18-24 inches, and cut four equal pieces of macramé rope.
- Prepare the Knot: Use a square knot to secure the ropes together at the center. This will be the focal point of your tieback.
- Create Patterns: Experiment with different knotting techniques such as the spiral knot or half hitch to add unique designs.
- Finishing Touches: Trim the ends of the ropes into a fringe or leave them as is for a clean finish.
Expert Tips and Tricks
- When starting, practice basic knots on a scrap piece of rope to build your confidence.
- Use a clipboard to secure your work while knotting for better control.
- Consider dyeing your rope for a personalized touch that matches your decor.
Common Mistakes to Avoid
- Not measuring your ropes accurately can lead to uneven tiebacks.
- Using too much tension while knotting may cause the ropes to fray.
By following these best practices and incorporating your personal style, your DIY macramé curtain tiebacks will not only enhance your window treatments but also serve as a conversation piece in your home. Start crafting today and embrace the beauty of macramé in your living space!
5. Macramé Dreamcatchers: Bring Whimsy and Style to Your Bedroom

Macramé Dreamcatchers: Bring Whimsy and Style to Your Bedroom
Transform your bedroom into a serene oasis with macramé dreamcatchers. These intricate, handcrafted pieces not only serve as stunning decor but also infuse a sense of whimsy and tranquility into your space. As a current trend in DIY & Creative Crafts, they allow for personalized expression while enhancing your interior style.
Step-by-Step Guide to Creating Your Macramé Dreamcatcher
Follow these expert-level steps to craft your own dreamcatcher:
- Gather Materials: You’ll need a hoop (wood or metal), macramé cord, scissors, and decorative elements like feathers or beads.
- Prepare the Cord: Cut multiple strands of macramé cord, each about 3-4 times the desired length of your dreamcatcher.
- Attach the Cord: Secure the cords to the hoop using a lark’s head knot, ensuring they are evenly spaced.
- Begin Knotting: Use various knotting techniques like square knots or spiral knots to create your desired pattern.
- Add Embellishments: Incorporate feathers or beads into your design as you knot, for added flair.
- Finish Up: Trim excess cord and hang your creation to enjoy!
Expert Tips and Common Mistakes to Avoid
- Tip: Use a mix of cord thicknesses for texture and visual interest.
- Mistake to Avoid: Don’t rush the knotting process; take your time to ensure each knot is tight and secure.
- Best Practice: Experiment with different shapes and sizes to find a style that complements your bedroom decor.
Creating a macramé dreamcatcher is a fulfilling project that showcases your creativity while adding a unique touch to your bedroom. Embrace this DIY trend, and let your imagination soar!
6. Macramé Keychain Holders: Functional Art for Entryway Organization

Macramé Keychain Holders: Functional Art for Entryway Organization
Macramé keychain holders are more than just a storage solution; they are a stunning blend of functionality and artistry that can elevate your entryway organization. As a current trend in DIY & creative crafts, these handmade accessories not only keep your keys in check but also add a stylish touch to your home decor.
Step-by-Step Guide to Creating Your Macramé Keychain Holder
- Gather Materials: You will need macramé cord (around 3mm thickness), a wooden or metal ring, scissors, and a measuring tape.
- Measure and Cut: Cut several lengths of cord, typically around 3-4 feet each, depending on your desired design and length.
- Attach to the Ring: Fold each cord in half and use a lark’s head knot to attach them to the ring. Ensure they are evenly spaced.
- Create Patterns: Use square knots, half-hitch knots, or spiral knots to form unique designs. Experiment with various patterns to personalize your holder.
- Finish the Ends: Once your design is complete, trim the ends neatly or leave them fringed for a boho look.
Expert Tips and Tricks
- Start with simple knots if you are a beginner. As you gain confidence, explore more intricate designs.
- Choose colors that complement your entryway for a cohesive look.
Common Mistakes to Avoid
Many DIY enthusiasts rush through the knotting process, which can lead to uneven tension. Always maintain consistent tension for a polished finish. Additionally, ensure your cords are cut to the right length to avoid frustration during assembly.
Best Practices for Your Macramé Keychain Holder
Regularly check the knots for durability, especially if you use it frequently. A well-maintained holder can last for years, showcasing your creative flair while keeping your keys organized. Remember, macramé is an art—embrace your unique style!
By incorporating macramé keychain holders into your entryway organization, you not only enhance functionality but also create a beautiful focal point that reflects your personal style. Start crafting today and transform your space with this trendy DIY project!
7. Macramé Wall Shelves: Combine Storage with Trendy Home Decor

Macramé Wall Shelves: Combine Storage with Trendy Home Decor
Macramé wall shelves are the perfect fusion of functionality and aesthetics, making them a hot trend in DIY & creative crafts. By incorporating these beautifully knotted pieces into your home, you can elevate your decor while maximizing storage space.
Current Trends in DIY Macramé
As we embrace a more bohemian style, macramé has surged in popularity. These shelves not only serve as practical storage solutions but also act as striking focal points in any room. Consider using natural fibers like cotton or jute to enhance the organic feel.
Step-by-Step Guide to Creating Your Macramé Wall Shelf
- Gather Materials: You will need macramé cord, a wooden board for the shelf, scissors, and a wall hook.
- Prepare the Cord: Cut your macramé cord into lengths that are three times the desired height of your shelf. For added stability, use multiple strands.
- Create Knots: Begin with a series of square knots to form the base. This will create a sturdy hanging mechanism.
- Attach the Shelf: Secure the wooden board to the knots and ensure it’s balanced before hanging it on the wall.
Expert Tips and Tricks
- Choose a color palette that complements your existing decor.
- Experiment with different knotting techniques for unique designs.
- Ensure the shelves are evenly spaced for a professional look.
Common Mistakes to Avoid
Many DIY enthusiasts underestimate the weight capacity of their macramé shelves. Always test the stability before placing heavy items. Additionally, avoid using cords that are too thin, as they may not provide adequate support.
Best Practices for Macramé Wall Shelves
Regularly check the integrity of your knots and cords, especially if holding heavier items. Incorporate plants or books that align with your personal style to enhance visual appeal.
Macramé wall shelves are not just a trend; they are a statement. By following this guide, you can combine storage with trendy home decor, making your living space both functional and stylish.
Frequently Asked Questions
How do I choose the right macramé project for my home decor?
To choose the right macramé project, consider your space’s aesthetics and your skill level. For a beginner, a simple macramé plant hanger can add greenery without overwhelming your decor, while a more advanced project like a wall hanging can serve as a stunning focal point. Assess your room’s color palette and style to ensure harmony in your design choices.
Why should I incorporate macramé into my home decor?
Macramé adds unique texture and warmth to any space, enhancing the overall aesthetic. This craft not only brings a bohemian flair but also allows for personalization through various knots and patterns. Incorporating macramé can create a cozy atmosphere, making your home feel more inviting and stylish.
What materials do I need for a macramé wall hanging?
To create a macramé wall hanging, you’ll need macramé cord, a wooden dowel or branch, scissors, and possibly a measuring tape for precision. Selecting the right thickness of cord is crucial for the desired texture, while a dowel will support your design. You can also incorporate beads or other decorative elements to enhance your piece.
How can I troubleshoot common macramé issues?
If your knots are uneven, take a moment to loosen them and adjust for uniformity before tightening. In case your plant hangers sag, ensure you’re using the right type of cord and weight capacity for your plants. Regularly check your macramé pieces for wear and tear to maintain their integrity and appearance.
What are best practices for caring for macramé decor?
To care for your macramé decor, dust it regularly with a soft cloth to avoid buildup. If it gets dirty, gently hand wash it with mild soap and air dry to prevent damage. Avoid hanging your pieces in direct sunlight for prolonged periods, as this can cause fading and weaken the fibers over time.

